 For Mapulu, accessing information from the whiteboard is a daily activity.
Viv Nuku (BLENNZ Resource Teacher Vision) describes how the introduction of a small whiteboard as a classroom resource, enabled Mapulu to focus on his learning rather than problem solving his access to shared information.
Viv also notes how this low tech solution was effective when other considerations such as lighting, seating, positioning and glare were taken into account.
Accessing the whiteboard
In maths, Mapulu often needs to read, record and respond to information on the whiteboard.
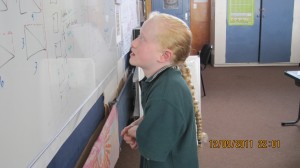
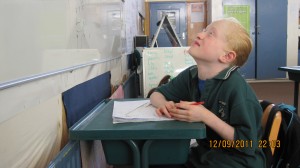
Although Mapulu’s maths teacher uses a black pen to give good contrast, Mapulu needs to get much closer to the whiteboard to access the information (figure 1 & 2).
At times Mapulu needs to get (fig. 1) out of his seat to get closer to the board. As he has to go back to his desk to write one or 2 numbers, the process is time consuming.
Another strategy Mapulu used was to take his desk right up against the board as seen in figure 2.
When the information was presented at head height when seated, this set up was workable, but usually Mapulu would need to sit with his neck at an acute angle to read the information high up above his head.
Trialling an individual desk whiteboard
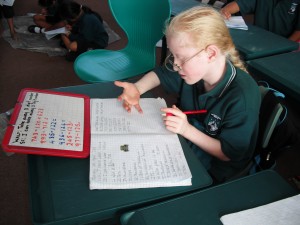
After chatting to Mapulu, we trialled a small whiteboard, which we placed on Mapulu’s desk, as seen in Figure 3. As a result of this simple adaptation, Mapulu was able to copy work at the same pace (or faster) as his peers.
The individual whiteboard can now be used by anyone (peer or adult) working alongside Mapulu or by Mapulu himself.
He is able to adjust the position of the board to suit his preferences, taking into account distance, glare and lighting.
Next steps for Mapulu
- Trial a monocular.
- Trial a camera to photograph the whiteboard and download the image onto a computer and zoom in on specific information on the whiteboard.
- Trial an iPad to photograph the whiteboard and then enlarge the image as required.
Useful Links
- Instructional Strategies for Mathematical Literacy on Paths to Literacy website.
- YouTube video tips on using the monocular from a low vision user.
Teaching and learning strategies and adaptations
Ensure the class teacher is aware of a student’s visual needs and the optimum conditions the student needs in order to be able to access print easily. At the beginning of the school year, I share a brief written overview of the student’s needs, when we first meet together. We also introduce some of the adaptations and considerations that may be useful to keep in mind, such as:
- making available large print texts,
- black pen on whiteboard,
- providing access to clear uncluttered print with good contrast,
- seating in an useful and inclusive position,
- building in extra time to locate visual materials,
- light source coming from behind or to the side,
- opportunity for seating near the focal point of the activity,
- verbal descriptions and clarification of tasks,
- encouraging a student to move to a position where he/she can see most comfortably,
- use of individual whiteboard or alternative tailored resources,
- familiarity with accessibility functions on school technology.
More information
Email us at BLENNZ Online for more information about this subject.
We will link you up with either the author of this post or another BLENNZ colleague with whom you can continue your conversation.


